Implementing SEO meta tags on a Next.js/Strapi website
Having a good SEO is critical for your website. An increasingly important part of that means having good meta tags for pages and articles on your site. We have an extremely scalable setup at ZEN Software using a headless CMS, Cloud Platform and a world-class content delivery network. Adding good SEO to a CaaS setup in 5 easy steps!
I set a couple of goals for this project, providing good basics for the site SEO:
- Successfully set up SEO meta tags for our website
- Enable link previews when sharing articles and pages on ‘the socials’
- Facebook,
- Twitter,
Our website’s technology stack and frameworks consist of the following:
- Frontend - Next.js project with dynamic routes & optional catch of all routes.
- Content Management System (CMS) - Strapi.io
Step 1. Create SEO component in Strapi
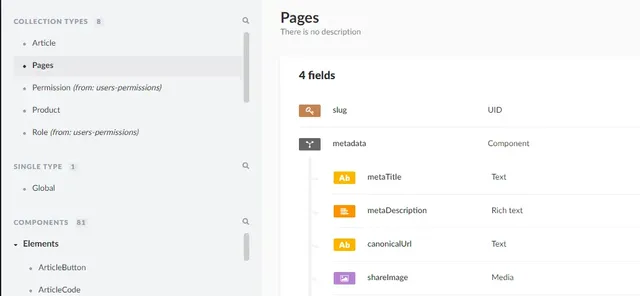
In Strapi Content-Types Builder create an SEO component. This component must contain the following fields:
- metaTitle (title of the page - the most essential SEO tag for SEO);
- metaDescription (description of the page content)
- canonicalUrl (helps to prevent duplicate content issues in SEO)
- sharedImage (image, which will be displayed as a preview, when you share the link to the page)

Add your SEO component to all of your Collection Types (like pages, posts, etc.)
Deploy Strapi changes.
Done!
Now you can fill in the basic SEO information to your Strapi pages.
Step 2. Create component for meta tags on the Next.js front end
At first for including meta tags on the front end we tried to use the NextSeo plugin. But it turned out that it doesn`t work correctly with Dynamic routes and doesn’t pre-render correct meta tags for links socials previews.
Therefore we went with writing the SEO component in Next.js. Important: to add tags in headers it`s highly recommended to use a special Next.js head component.
We include the Seo component in the [[…slug]].js file with the following props:
- metadata - data from Strapi page data;
- pageContext - from Strapi page data;
- headerTitle - this is formatted metadata.metaTitle;
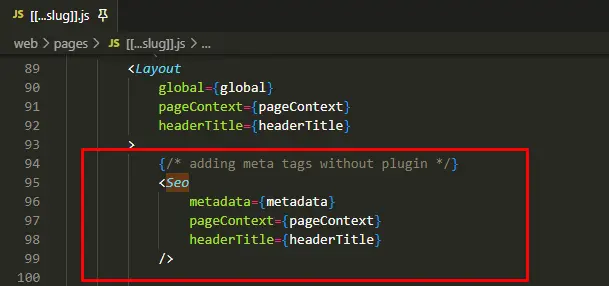
The Seo component will be a Next.js <Head> component, which includes all the meta tags:

We`ll see which tags we need to add in the next step.
Step 3. Add general meta tags
The list of the tags you definitely want to add to your page:
- title: the title tag is the most important one. We get data for it from Strapi metaTitle field.
1<meta name="title" content={metadata.metaTitle} />- description: data from Strapi metaDescription field.
1<meta name="description" content={metadata.metaDescription} />- canonical: canonical URL for your page from Strapi:
1<link rel="canonical" href={metadata.canonicalUrl}></link>What about keywords?
There are meta tag 'keywords', which were used to set keywords for the page in the past. Bot at least since 2009 Google doesn`t use it anymore, so you can skip it.
Step 4. Add Open Graph meta tags
The Open Graph protocol enables any web page to become a rich object in a social graph. It allows you to control your webpage's appearance on sites like Facebook, Twitter, etc.
You can find the full list of tags provided by Open Graph here.
Let`s add the most essential ones to our page:
- og:title: same as the general title meta tag. The value will appear as the title for your link`s preview on Facebook & LinkedIn.
1<meta name="og:title" content={metadata.metaTitle} />- og:description: same as the general description meta tag. The value will appear as a description for your link`s preview on Facebook & LinkedIn.
1<meta name="og:description" content={metadata.metaDescription} />- og:url: canonical URL for your page from Strapi:
1<meta name="og:url" content={metadata.canonicalUrl} />- og:image: preview image for your link's preview on Facebook & LinkedIn. In our case, if sharedImage in Strapi is missing, we use the article's preview image instead of the default image
1<meta
2                name="og:image"
3                content={
4                    metadata.sharedImage ??
5                    pageContext?.articleSettings?.previewPicture?.url ??
6                    'https://www.zensoftware.nl/image/logo.jpg'
7                }
8 />- og: locale: the language of the page. Should be passed in the standard format 'en_GB'. You can get your page locale from pageContext prop.
1<meta
2                property="og:locale"
3                content={formattedLocales[pageContext?.locale]}
4 />- og:type: 'website' by default. but if your site has some kind of news or blog post, you might want to set its type as an 'article'.
1<meta
2                name="og:type"
3                content={pageContext?.articleSettings ? 'article' : 'website'}
4            />
For pages with the type 'article' Open Graph offers additional tags:
article:published_time- datetime - When the article was first published.article:modified_time- datetime - When the article was last changed.article:expiration_time- datetime - When the article is out of date after.article:author- profile array - Writers of the article.article:section- string - A high-level section name. E.g. Technologyarticle:tag- string array - Tag words associated with this article.
Step 5. Twitter Card meta tags
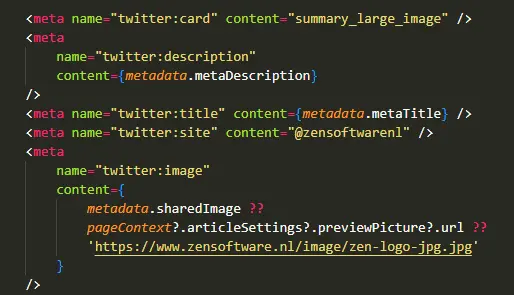
Unlike Facebook or Linked in, Twitter uses its tags to display link previews. Don`t forget to add them as well. You can find a full list of meta tags on the Twitter Developer Platform.
Step 6. Allow crawling for socials
In some cases, you can find that even after adding all the required tags, previews in socials are still not displayed.
That might be because crawlers of these socials are not able to crawl your site yet. To fix this, allow Twitter and FB crawlers in your robots.txt file:
1# Allow all crawlers
2User-agent: *
3Allow: /
4Disallow:
5
6User-agent: facebookexternalhit
7Disallow:
8
9User-agent: Twitterbot
10Disallow:
All set!
Now you can deploy your site and check meta tags both in your browser`s DevTools and metatags.io
Don’t forget to celebrate!

Lightning-Fast Site, Awesome Conversion
Deliver content worldwide with a site that never slows down. Forget the WordPress or Magento delays—fast, safe, and cloud-based!
Read more:

Implementing SEO meta tags on a Next.js/Strapi website
Having a good SEO is critical for your website. An increasingly important part of that means having good meta tags for p...

ZEN Software upgrades Wordpress Filogic.nl to Open Source Headless Cloud Solution for Unmatched Performance
Alkmaar, November 2023 — ZEN Software, a leader in innovative web solutions, proudly announces its latest success with F...

The AI Revolution: How Generative AI is Making SEO practices Obsolete!
Artificial Intelligence (AI) and Generative AI are leading a revolution that will obsolete traditional SEO practices lik...

Migrate from WordPress to a new CMS
WordPress has been our Content Management System (CMS) since forever at ZEN Software. Why would we ever change a winning...

What’s wrong with GA4, or how to find essential reports in Google Analytics
Google Analytics 4 (GA4) reporting has received some criticism and feedback from users since its release. Despite GA4 of...

A Developer's Guide to Agile Rollouts: adding Feature Flags in React
**Feature flags**, also known as **feature toggles** or **feature switches**, are a powerful tool in software developmen...
